The advent of digital photography has seen some remarkable developments as technology has advanced. Auto Focus (AF) systems are one aspect of this progress. In this article, we’re going to look further into AF systems, how they work, how to use them and, just as importantly, when not to use it.
What Is AutoFocus?
Put simply, AF is a system that automatically focuses a lens on a subject seen in the viewfinder. On most modern digital SLR camera lenses, there is a button that can be moved to AF or MF (Manual focus). When AF is selected, a DSLR will detect that setting and show the AF facility via the viewfinder. For DSLRs, AF comes in the form of several points across the scene that can be selected individually or collectively.
On many compact cameras, and for that matter, smartphone cameras, AF takes the form of a square indicator on the viewfinder screen showing the area the camera has locked onto. Invoking AF for most cameras is just a case of partially depressing the shutter button and checking through the viewfinder that AF has focussed the lens on the subject of the scene.
It’s a valuable facility especially for those photographers who may not have perfect vision and have difficulty is manually focussing a lens. AF also comes into its own when shooting fast-moving situations such as sports events. AF can allow you to capture specific moments correctly focused.
Understanding AutoFocus
First, to understand how AF works, let’s try a little experiment. Take a DSLR and make sure the lens is set to AF. Now point the camera up towards the clear blue sky and invoke AF. Nine times out of ten it won’t work. All you’ll see is the lens’ system continuously focussing in and out trying to get a lock.
Now try the same thing on a smooth uniformly coloured, uniformly lit wall. Again, nine times out of ten it won’t work with the same results as the previous example. Other situations might include very low light situations or subjects with extreme backlighting; effectively the camera sees an almost dark silhouette with little contrast.
Why is this happening? AF relies heavily on the camera’s sensor to detect levels of contrast in the scene to achieve a lock onto the subject. By contrast, we mean areas of notable light and darkness. As technology has progressed, modern lenses only need to be able to detect the most subtle differences in contrast for its AF system to work. However, AF is not foolproof.
Depending on the make of camera you have, using AF will depend on a visit to the manufacturer’s User Guide. However, for this article, we’ll consider the basic AF system found in Canon DSLRs. Most entry and medium-range Canon DSLRs will have a 9-point AF system shown below arranged as seen through the viewfinder.
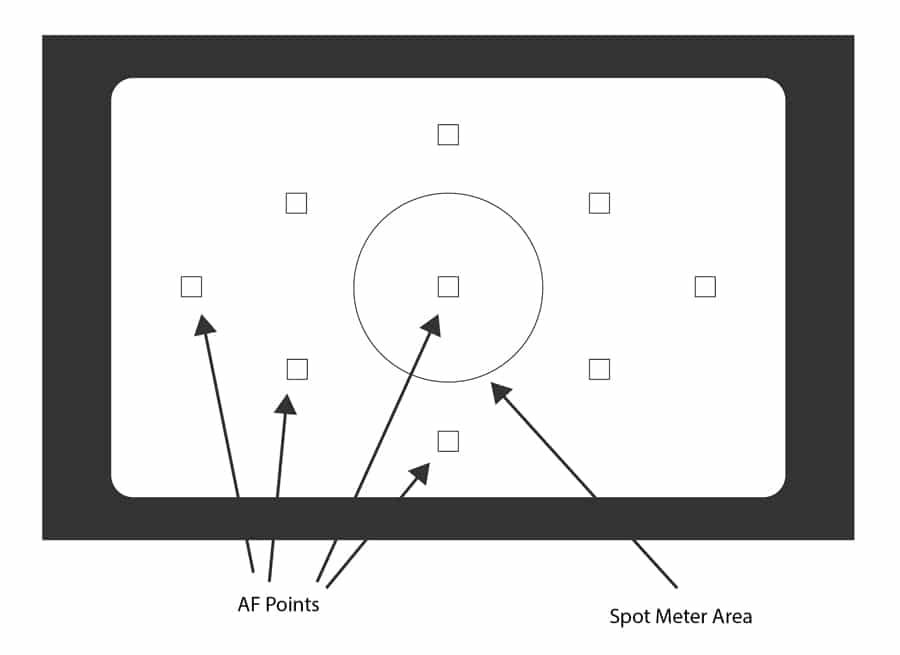
With the lens in Manual Focus mode, the AF points appear as simple grey squares through the viewfinder. However, once the lens is put into AF mode, the AF points will become active. Depending on how many AF points are selected will depend on how many activate when the shutter button is slightly depressed. In the diagram below, all 9 points have been selected to be active.
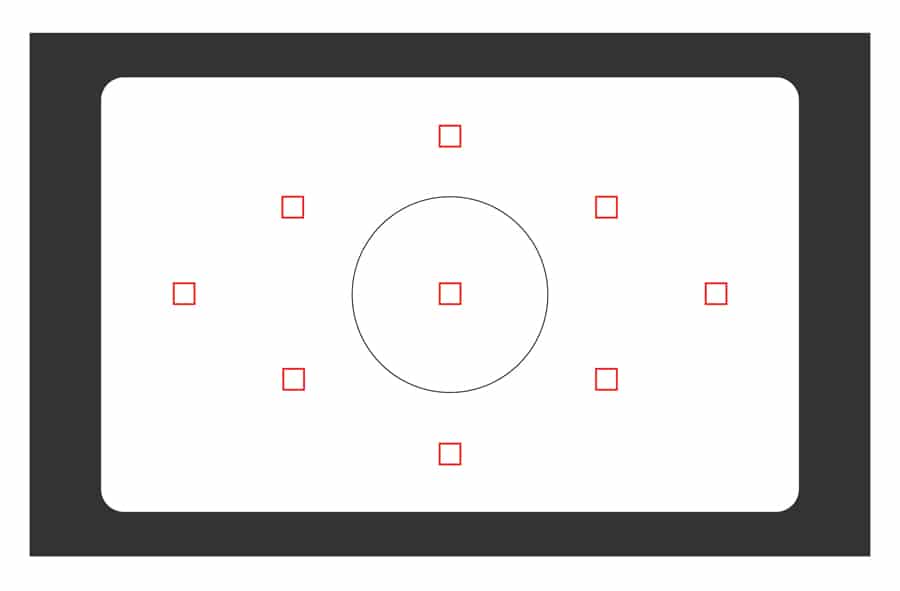
In this scenario, the camera will adjust the focus of the lens so that all elements in front of each AF point are focussed.
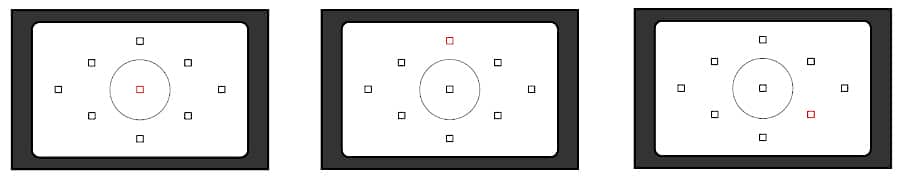
Individual single AF points can be selected depending on the situation. The illustration shows just the centre AF, top AF and bottom right AF selected.
Before we look at the practical uses of AF points, one question continually arises; is AF affected by aperture setting? This is a legitimate question since aperture affects depth of field. The simple answer is No.
Whenever you use AF to focus on a specific point in the scene, the camera automatically opens the aperture to its widest possible setting. Why? Well, both the person who made the lens and the person who wrote the software to activate AF will have no idea of the distance of your subject nor the amount of available light entering the camera.
If we remind ourselves that AF relies on contrast, it makes sense to allow as much light in as possible. When the selected AF point locks onto the subject in front of it, the focus will be set to the shortest depth of field. Once AF has locked on, the camera returns the aperture to its original setting.
Using AF Points Effectively
The group shot example below is an excellent example of how to use all AF points to ensure the lens is optimally focussed on capturing all elements in the shot. With the light fading, a small aperture and extended depth of field would have taken the shutter speed down to the point where a tripod would have been needed. With no tripod to hand, this shot was achieved at F8 at a 17mm focal length at 1/50s.

Using individual AF points comes into its own in particular situations. For example, in studio portraiture, the rule of thumb is to ensure the focus point is on the subject’s eye. So selecting an AF point that achieves this is all we need to do. Wrong. There are also other considerations. Portraiture is shot in portrait format, not landscape. So which AF point do we use?
In the example below, the top-right AF point was chosen. Then the camera rotated 90 degrees count-clockwise to get the portrait format. The AF point now becomes top left allowing the focus on the subject’s eye to be achieved.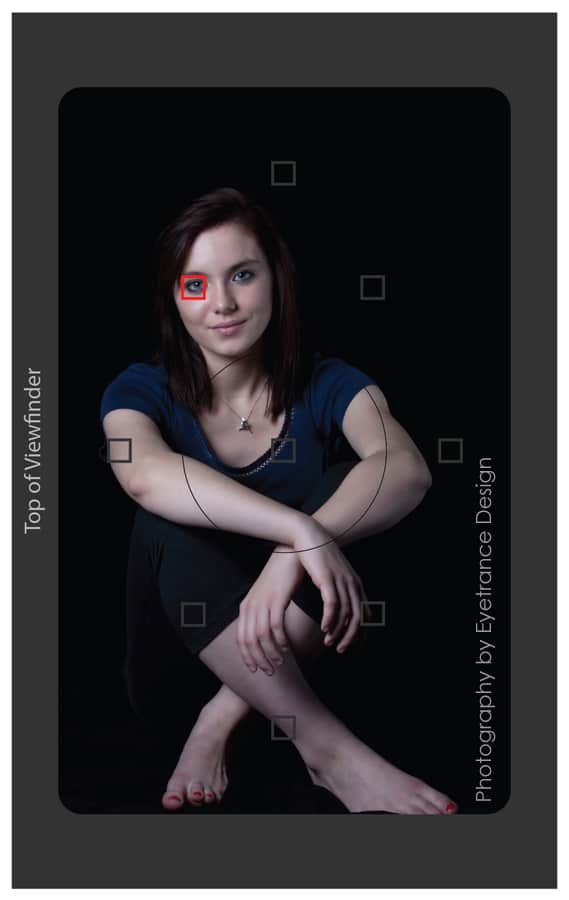
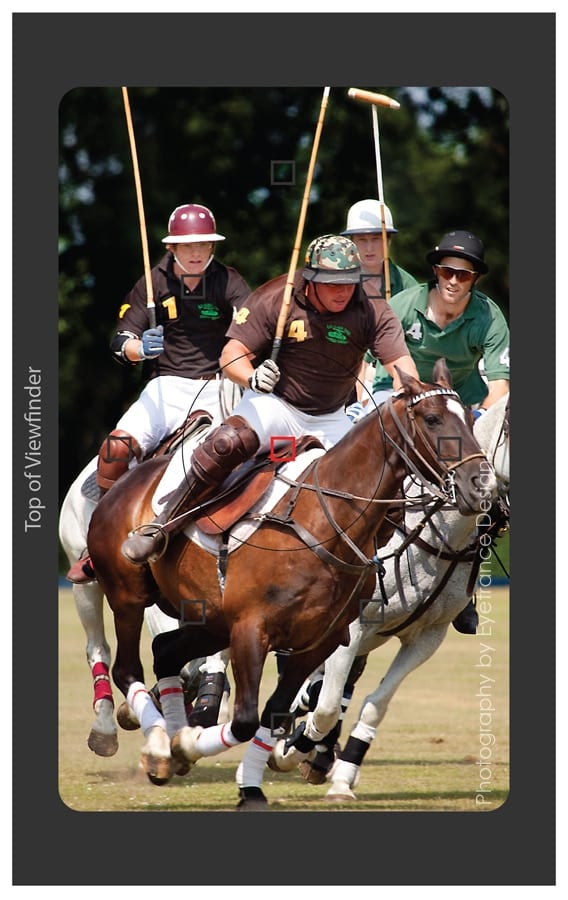
The centre AF is the most sensitive and proves valuable in getting action shots. Because of its sensitivity, the time to focus is very rapid, so it’s ideal in sports photography. Unlike portraiture, it’s not essential to focus on the participants but the overall action in which they are involved.
The following example shows how centre AF is used when photographing a polo match. Polo can be very fast and furious giving very brief opportunities to capture the action. In the example below, the lens was set at 400mm at F5.6 giving sufficient depth of field to isolate the subjects from the background and achieve a sharp image at a shutter speed of 1/400s.
The right AF point to choose depends on whether you’re shooting in landscape or portrait format, how you decide to frame the shot and what element in the shot is the most important point to focus on. The primary consideration is that to use an AF point to focus the lens; the shutter button must be slightly depressed to activate that AF point. What if the subject is moving?
That would require you to manually depress the shutter button several times to keep the AF point focussed. This is most common when shooting subjects moving towards or away from you. It also applies to subjects moving across your field of view.
To illustrate the latter scenario, image standing at the edge of a road with your camera pointed to the opposite side of the road (or 90 degrees to the road direction). Now imagine a car travelling down the street from your right to your left. If you point your camera at the car when it is 100 yards away, there will be a specific distance from your camera to the vehicle. As the vehicle travels along, the distance decreases.
The shortest distance will be when the car is precisely in front of you. As the vehicle continues to move to your left, the distance from your camera to the vehicle begins to increase. Because AF is primarily designed to tackle stationary objects, it not suitable for moving objects.
There usually are two additional AF modes built into most modern DSLRs to tackle this problem. Canon DSLRs have AI Focus and AI servo focus modes. Nikon’s equivalent is AF-C where C stands for Continuous. Both work in the same way.
For Canon, AI Servo is designed to maintain focus on a continuously moving object where the distance to the object is continually changing.
You can select your AF point, put the camera into AI Servo mode and once the camera has locked the AF point of the subject it will maintain the focus by merely keeping the shutter button slightly depressed. Similarly, AI Focus is designed to maintain focus on a still subject that starts to move. Other manufacturers refer to this focusing system by other terms so make sure to check out the User Guide for your particular make and model of your camera.
When AF Doesn’t Work
AF is not the answer to all situations. We were recently asked to do a commercial shoot for a new private nursery to produce imagery for both their website and printed advertising. One of the shots that I wanted to achieve was a couple of toddlers sat on the grass at the rear of the nursery trying to catch bubbles. Great idea! Lots of fun, smiles and infectious giggles.
The customer chose two toddlers, seated them where required and produced a bubble-making gun which did its job magnificently in capturing the children’s attention. This is one situation where you do not want to use the AF mode. Imagine bubbles crossing the view of the toddlers. The AF mode will be continually adjusting its focus as objects appear and disappear in front of it, and you won’t get the shot.

The trick in overcoming this is to take up position and select an AF point to initially focus in on one of the children. Once done, pop the lenses into Manual Focus mode, set the aperture to a medium setting, check that the shutter speed is not too low and then let the bubbles flow! What you get are shots where the toddlers are always in focus as will some of the bubbles. Other bubbles in front of and beyond the depth of field will be out of focus giving each shot a magical touch.
AF And Compact Cameras
As AF is a facility that is switched on and off via the lens for DSLRs, compact cameras use a slightly different system. The sensor in compacts measures infrared light emitted from the camera to calculate the distance of the subject and adjust focus accordingly.
However, most compacts can be switched to manual focus mode allowing you more control over the shot. This is ideal for macro work where you can see precisely which areas of the image will be sharp.
Focus Peaking (FP) is a facility introduced initially by Sony but which is finding its way into more compact and DSLRs. FP originated from video where it was essential to set the camera optimally to capture a scene correctly.
Compacts and DSLR FP allows you to do the same in real time. Cameras with the FP facility will enable you to view the scene live via its LCD viewing screen and determine which areas of the scene are sharp and which are out of focus.
At the same time, you can adjust focal length and aperture to see precisely the changes in focal length that occur. This is especially valuable in detailed work such as macro photography and where time to complete the work is of the essence. Check out your User Guide to see if FP is included in your camera’s capabilities.
If you haven’t joined an IOP® Online Photography course yet:
Read our FAQs here.
Perhaps you are thinking about what qualification is best. Read this blog on whether you need a degree to be a photographer.
If you need advice on which camera to buy, you can get in touch with us or read this article on the best DSLRs for beginners.
If you want to take control of your earnings by starting a career in photography, check out this article on the best places to make money from photography.