We’ve all seen the incredible astrophotography of the clear night sky, bursting with stars and all the colours of the Milky Way. But have we ever given much thought to how we can recreate these images?
Shooting the night sky and more specifically, the stars requires a little more in technique and knowledge than just a simple long exposure. In this article, we’re going to take a look at how you can achieve stellar astrophotography.
What Will You Need For Astrophotography?
Full Manual Mode
To begin with, you’ll need more than just a point and shoot digital camera. Most bodies these days will have the ability to shoot in full Manual mode, but you’ll also need something with a substantial sensor and the ability to create large RAW images. If you’re shooting with a mid-range mirrorless or DSLR then you’ll generally be in a good position.
Manual Focus
You’ll have real trouble engaging the autofocus in the dead of night and in an area where you want as little light pollution as you possibly can so it’s essential your body or lens has a manual focus option. This way you can engage the live view screen, zoom into particular areas of light and manually focus by eye to far higher degrees of specificity.
Tripod
A robust, tripod is essential, ideally with a head that allows for a substantial angular change. You’re going to be aiming at the sky, remember, and even if the stars aren’t your primary concern, you’ll often be composing images that may contain large buildings or vast landscapes, so it’s worth having the flexibility within the tripod, rather than having to move your entire set up.
It’s also imperative that while your shutter is open, there is no chance of any movement from your kit. The tripod plays an integral role in this.
Wide Angle Lens
Your lens choice is usually down to the discretion of you – the photographer, and your intentions – but generally, a wider angle focal length is a big help. If you’re shooting for an all-encompassing, dramatic nebula shot, only the wide angle will do. Try to look at anything from 10 – 14mm. You’ll find that even at full frame, you’ll start to struggle around the 18-20mm mark regarding fitting a good ratio of landscape and sky into your frame.
Remote Trigger or Shutter Timer
Continuing with the theme of staying clear of any movement within your kit, a remote shutter trigger is often a good idea, but it’s not imperative. Just engage your shutter timer so that once you’re all set up and ready to start shooting, there’s no chance of interference from a clumsy hand or a foot knocking a tripod etc.
The Process For Astrophotography
Now that you’ve got your gear set up and ready you can begin the preparation for shooting. Be aware at this point that the shooting process for any night time or astrophotography image – in fact, for any long exposure image – is more time-consuming than your average shooting method, so be ready to take your time and set up accordingly before shooting. It’s vital that we first distinguish between the two.
Night vs. Astrophotography – The Difference
If your main intentions are to shoot a landscape at night, then you can treat the whole process as your basic long exposure. Perhaps you’re shooting a cityscape; maybe it’s a tranquil forest scene. The rules will generally be the same and will revolve around a trial and error process in Manual mode.
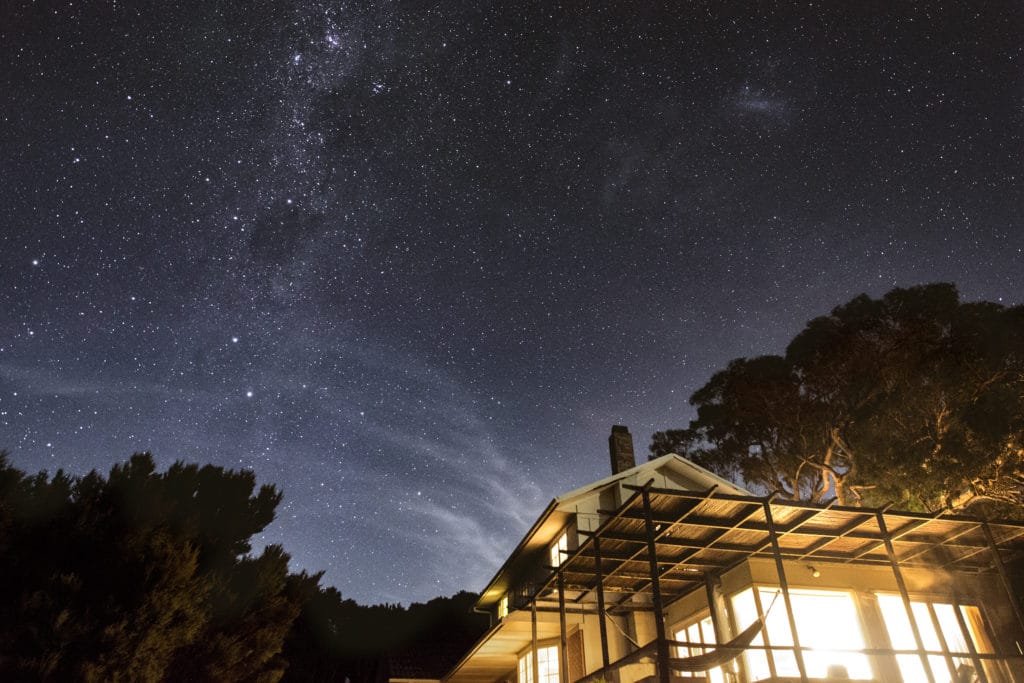
The difference between this and shooting astrophotography is mainly within the increase of ISO, so that the tiny twinkling lights, millions of miles away are picked up quickly by your sensor.
Let’s have a look at the process for each, stage by stage.
Set Up and Compose Your Image
This is the same for both Twilight and astrophotography. Just get yourself set up with you appropriate lens and focal length. A wider focal length is always better with astro so we can include a good proportion of landscape while still keeping the sky a significant part of the frame.
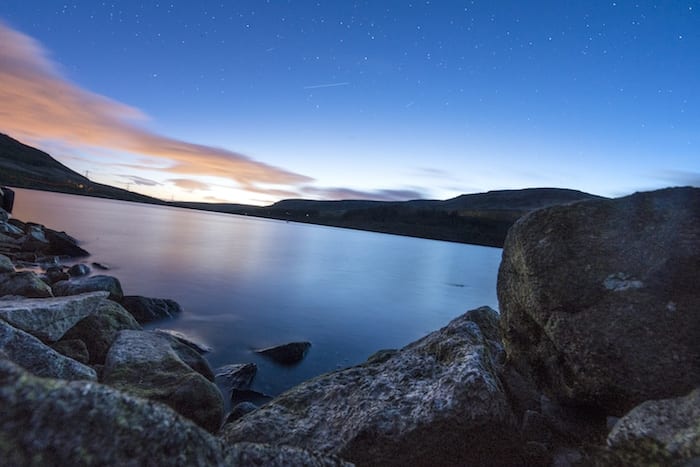
If you’re shooting astro, you’re going to need to be in an area where light pollution is at an absolute minimum – preferably non-existent. It’s also worth researching where the Milky Way is facing at your preferred location if this is what you’re after.
Use the Live View Finder and Focus
Again, this is generally the same. If you have areas of light – for example in a cityscape – the autofocus will have no problem locking in, but in that blackout landscape you’ll have to use the live view and the zoom in to something such as the moon or a nearby star, using your manual focus ring to get this as close to sharp as possible.
Aperture, Shutter and ISO
Night Time Photography:
This is where things start to differ. If it’s only the landscape your interested in, then you have all the time in the world. Set yourself up in Manual, get an ISO of 100 to stay away from any noise, choose a medium to narrow aperture and a good, long, shutter speed – 10-15 seconds is a good starting point for an F/8, for example. You can then have a play around with your results by simple trial and error.
Astrophotography:
Where the stars are your priority, we need to find a middle ground. One where the actors can expose quickly, not just because they’re incredibly delicate amounts of light to the sensor, but because with every passing second the earth is moving and so too are the stars. Too long shutter speed and we start to get star trails instead of pin-prick exposures.
In this instance, you may have to find yourself at around the 1500 – 3200 ISO mark, but be wary with the amount of noise starting to creep in. This will be entirely dependent, again, on your sensor. You’ll probably find that your shutter speed is a little quicker than in the above example, but you’ll still be able to shoot at the likes of 10-15 seconds without noticeable movement in the stars themselves.
That’s about it. Though there are some guidelines on kit and process, once you’re out there and shooting this is very much about trial and error. If it helps, take notes as you go so that you know where you’ve come from and where you’re headed. This will also be a good reference point to start from then next time you’re out in these conditions.
Find out more about our courses here
Download a Free Prospectus
Get your Free Guide To Composition here