You may not know it, but you’ve got lots of information hidden inside your digital photos. This data, known as EXIF (Exchangeable Image File) is handy information, but it can be easily lost without knowing about it. If you’ve never heard of EXIF, read on to understand how it can benefit your photography.
Firstly, before we discuss EXIF, it’s best to make sure you fully understand JPEGs – one of the most commonly used image files types.

Understanding JPEG
Where would we be without compressed files? We’d be waiting for a long time every time we wanted to send our photos via email or watching the spinning load wheel while we waited for them to upload to a sharing site or social media.
Compression techniques allow an image file to be compressed to a fraction of their original size without resulting in a significant loss of quality.
This is precisely what a JPEG file is; merely a compressed version of the original file. It’s not, as is commonly thought, an image format, but a compression method to reduce large file sizes.
How is an image compressed?
JPEG compression uses DCT (Discrete Cosine Transform). First, it separates the image into sections of visual importance and then works out what parts of it can be removed without affecting the quality. The whole process gets very technical, but the result is a smaller image size.
The quality of the image has to drop a little depending on the amount of compression used, but if the right amount is applied, you’ll barely notice the difference. This form of compressions is sometimes referred to as ‘lossy compression’ which is down to the fact that during compression some of the data from the image is lost permanently.
When the image is decompressed and viewed, some data that was in the original photo will be missing. However, the aim is to end up with an image that looks just like, or very close to the uncompressed version, despite the loss of data.

File Headers
All JPEG files a ‘file header’. Information relating to the image is stored here and read by applications that are attempting to load it. It’s also where valuable EXIF data is stored. EXIF data is created by your camera and transferred on to each photo you take. It holds details about the camera and the image settings used when the photo was taken
Using EXIF data
EXIF data is perfect for beginners and advanced photographers, helping you to find out exactly why a photo didn’t come out as expected. Was the exposure just right or was it under or over-exposed? Did you use the correct aperture or shutter speed setting for the situation? Did the flash fire? EXIF data can answer all these questions and more. It acts as an invaluable source of information when you want to look back over your photos; you have detailed technical information on each photo you have taken in your collection. All in all, EXIF acts as an invaluable reference that adds a new dimension to your understanding of your photography.
Where Can I Find My EXIF data?
Flickr
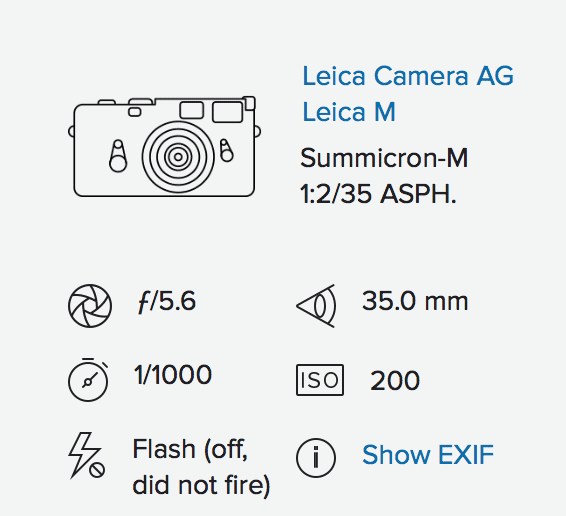
It’s easy to find your EXIF data on Flickr. Just click into the image and then the ‘Show EXIF’ button.
Windows
Right-click on the image and select ‘Properties’ and the ‘Details.’
MacOS
Open the image in Preview; click Tools then select the EXIF tab
Wiping EXIF data
We don’t recommend you do this for many reasons, mainly because it’s best to keep all the information on the image within it, not least so you can prove you are the owner. When exporting an image, it’s possible to control how much EXIF data remains in the file e.g removing location data to protect privacy.
If you are sure you want to wipe your EXIF data, it will depend on the operating system that you are using. If you are an IOP Student, a Tutor can help you with this. Just get in touch with them via the Course Platform as normal.
Be careful when uploading your photos to sharing sites if it’s essential that EXIF data remains intact. Some places like IMGUR delete EXIF data. If you were uploading your images for Tutor critique, for example, you want to make sure your EXIF data is intact so the Tutors can view it. This way, they can give you the best advice on your photography.
Understanding EXIF Data
Here is a list of information that the EXIF data will normally provide and what each one means
- Make: The make and model of the camera
- Software: Any software that has been used E.g Adobe Photoshop Lightroom 6.12 (Macintosh)
- Date and Time: The day, month, year & time the shot was taken. You may have a modified date and time and an original date and time if this has been changed.
- ISO Speed: The ISO setting used for the shot.
- Exposure Bias: Indicates if any expsoure compensation was used.
- Max Aperture Value: The maximum aperture of the lens.
- Metering Mode: The type of metering used e.g Center-weighted average
- Light Source: The white balance setting
- Color Space: Shows which colour mode the photo was taken in e.g sRGB
- Exposure Mode: The mode the photographer used when taking the photo e.g Aperture Priority
- Lens Info: The type of lens used e.g 35mm f/2-16
- Lens Make: The make of lens used e.g Leica Camera AG
- Lens Model: The model of lens used e.g Summicron-M 1:2/35 ASPH.
- Compression: The type of compression used e.g JPEG (old-style)
- Camera ID: An ID number which helps you identify your camera if it gets lots or stolen.
- Location: GPS data and geolocation of image
Using EXIF data
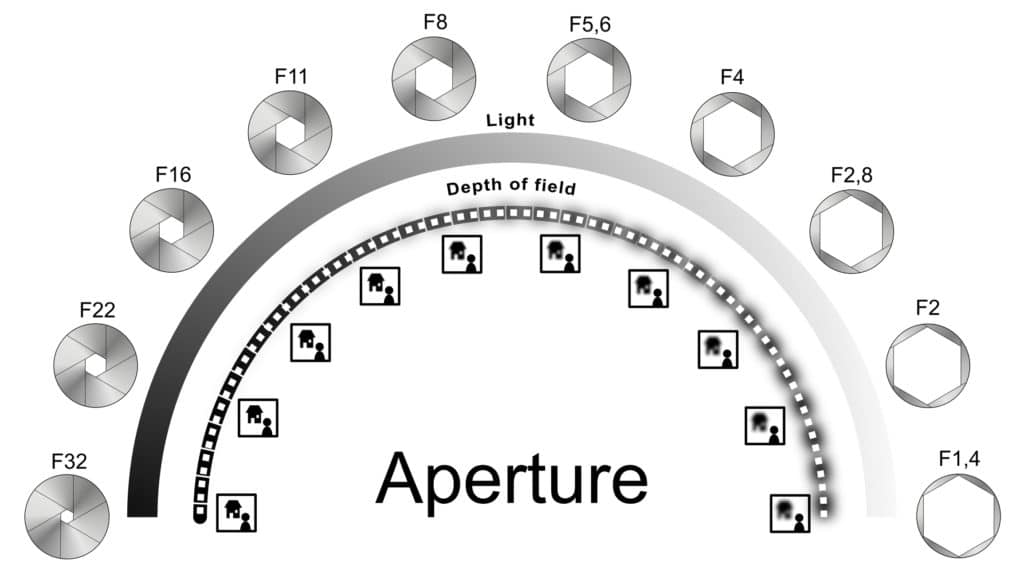
Find some of your favourite images on Flickr and start exploring the EXIF data. With a bit of knowledge, you can see exactly how the image was produced; which lens was used, the shutter speed, exposure mode, f-stop and much more. This will give you a real understanding of what is needed to craft your own perfect images in similar conditions.
Equally, if you have a photograph that has not quite worked, let’s say it is not as sharp as you would like, you can use the EXIF data to investigate why. Imagine you wanted to capture a sharp portrait handheld but when you get home, the portrait is blurry and out of focus, check the EXIF data and take a look at the shutter speed. It could be that the shutter speed used is too slow for a handheld shot and that’s what has caused your blur.
Remember, if you are an IOP Student, your Tutor can help you with this, so get in touch with them.
If you are not yet a student, why not join 20,000 other photography enthusiasts on the market-leading online photography course platform? Start now.