Image Editing: A Beginners Guide
Whenever I discuss editing with students, I try to keep my advice as simple and concise as possible. No matter what the ability, a general photo editing process can differ quite dramatically from person to person. Much like photography, your editing style will change over time and with your level of experience. The difficulty, first and foremost, comes with the way that editing can envelop and consume a photographer. It’s a dangerous game!
The act of shooting, of photographing a scene, can take milliseconds. The general flux of life means that whenever we photograph a scene we can never replicate it accurately. But once that moment is captured, we have all the time in the world to manipulate and play with it, and an uncanny eye can be sucked into a state of over-working.
Successful editing takes a very keen eye and a complicated mix of preparation versus snap decision-making and knowing when to stop. At the very base of all editing, is the ability to know when you’ve gone too far. When you begin to jeopardise the integrity and even the ‘reality’ of an image – which is very easily done – it’s time to stop and go back a few steps.
In this article, we’ll be looking at the main differences between the big players in the editing world – Lightroom and Photoshop, and giving a few hints and tips when it comes to the basics in editing your images.
What are the main differences between LR and PS?
Put quite simply, the difference between Photoshop and Lightroom is based on the amount of images you want to change using one or more of the same processes at one time. This is known commonly as ‘Batch Editing’ and is used when we have large volumes of images.
Lightroom would be used by photographers to batch edit. In LR we can view large numbers of RAW images from shoots such as weddings, where large quantities of photographs need to be consistent and have been shot in a similar light.
Here we can select groups of images easily and sync our editing process so that whatever you do to one image, you will do to all the images in that group.
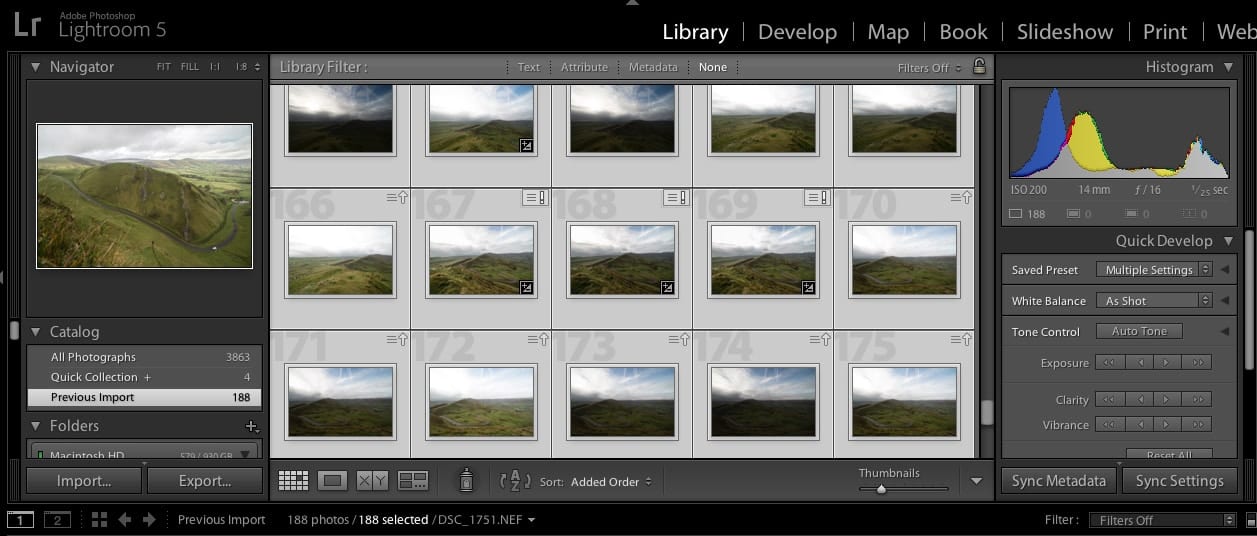
Dropping large groups of RAW files into Lightroom can make basic editing of exposure, levels, white balance, etc. much easier and consistent. You can see here that the selected images are all easily manageable in one place and the basic editing techniques are provided on the right-hand side.
You would then go on to tweak further levels, colours, and retouch (remove blemishes, impurities, crop, sharpen, etc.) in Photoshop. Though all of the editing techniques available in LR are also available in PS, you will find it more difficult to batch edit here, and so moving between the two programs can be much easier. This is down to preference, remember. You may just want to use Photoshop’s Camera Raw to essentially batch edit some images, but it will be far more limited regarding the volume compared to what Lightroom can handle, so just be wary of this.
Lightroom Presets
You may have noticed the word Pre-set thrown about in the forums and on various editing programs, particularly in Lightroom. This refers to all of the various processes and tweaks that are available in the ‘Develop’ section of the program.
As you can imagine, there are an infinite number of processes available, and you can even save your own presets, however basic, again as a way of preserving consistency which you may want for a completely separate shoot down the line, for example.
Photographers will work over long periods of time to distinguish and develop their styles and then save them as presets. Some even devote themselves to selling their presets to be used by others.
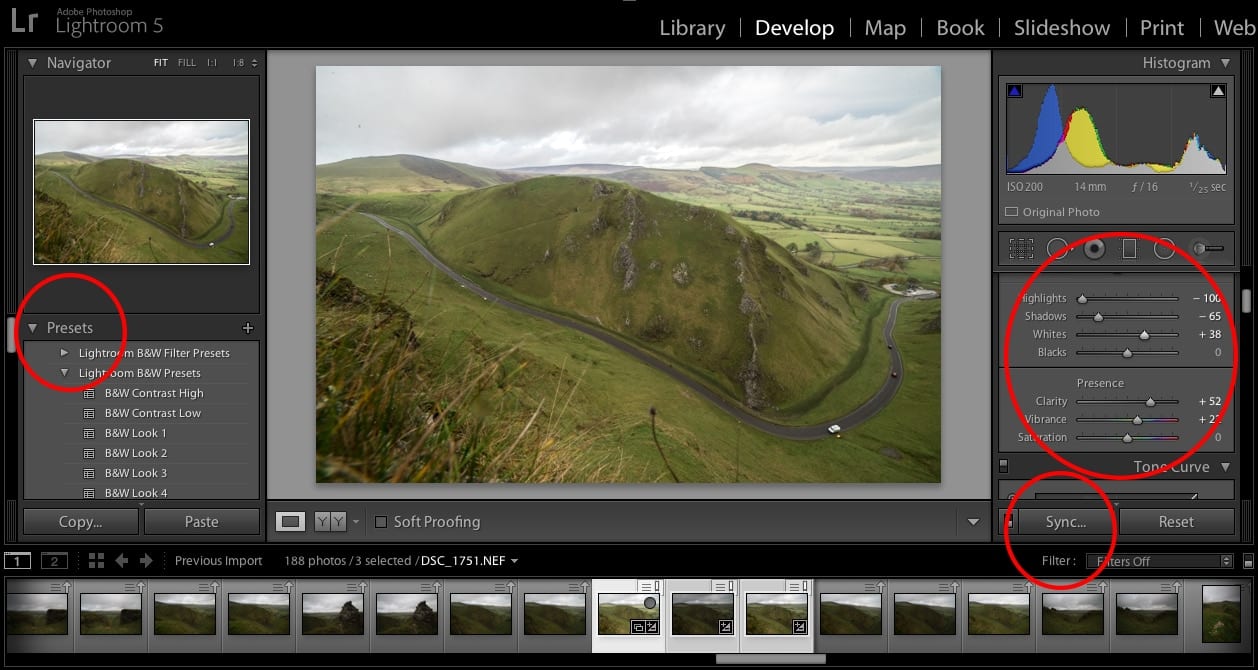
The screen grab here shows the Develop tab in Lightroom. Notice how the Sync option is available for further editing and adjustments and on the right-hand side, you can choose from a number of presets, as well as save your own.
So where should you begin when editing?
Now that you’ve been given a basic idea of what distinguishes Lightroom from Photoshop and how you would ideally use one over the other, it’s important that you know the basics when it comes to editing your images.
Some of you may have heard me say that your editing should never go against the integrity of the image itself an image, but enhance only what the images strengths are. By this, I mean that trying to make your photograph look like something it isn’t will leave you, quite simply, with an unsuccessful photograph. Don’t try to darken and increase drama to a landscape’s sky containing white, fluffy clouds. Don’t sharpen an image containing a lot of finer and similar detail, such as leaves, grass or foliage. It’s also very important to know that editing cannot and will not salvage or ‘save’ a poorly shot image. If you have an image which is out of focus or blurry, you cannot bring it back by overly sharpening or clarifying that image. I’ve seen a lot of examples of this sort of thing, and in fact, it’s often this idea of ‘salvaging’ an image that sees photographers venturing into that dangerous realm of ‘overworking’.
Have A Rough Idea
You should always have an idea of what, to begin with when opening images for editing. Whether it’s in PS Camera RAW or Lightroom, you will be given the same tools to work with. Each image will have its strengths and weaknesses, and if you can see these before you’re even uploading them, then you’ll have a good start in the editing process.
Work Systematically and Use Logic
Remember, that the more you do to an image, the more you put a strain on it, and even a 30MB RAW will have a breaking point. My advice would always be to start with your exposure and levels here. In-camera RAW you are dealing with the largest and most immaculate version of your image, so getting the light and quality right before going into the finer detail is always first up. When you’re happy with your image, only then should you resize/crop (though this is something I would never recommend unless integral to the reading of the image) and ‘Save As’ your Jpeg/PNG, etc.
A Quick Note on Compression
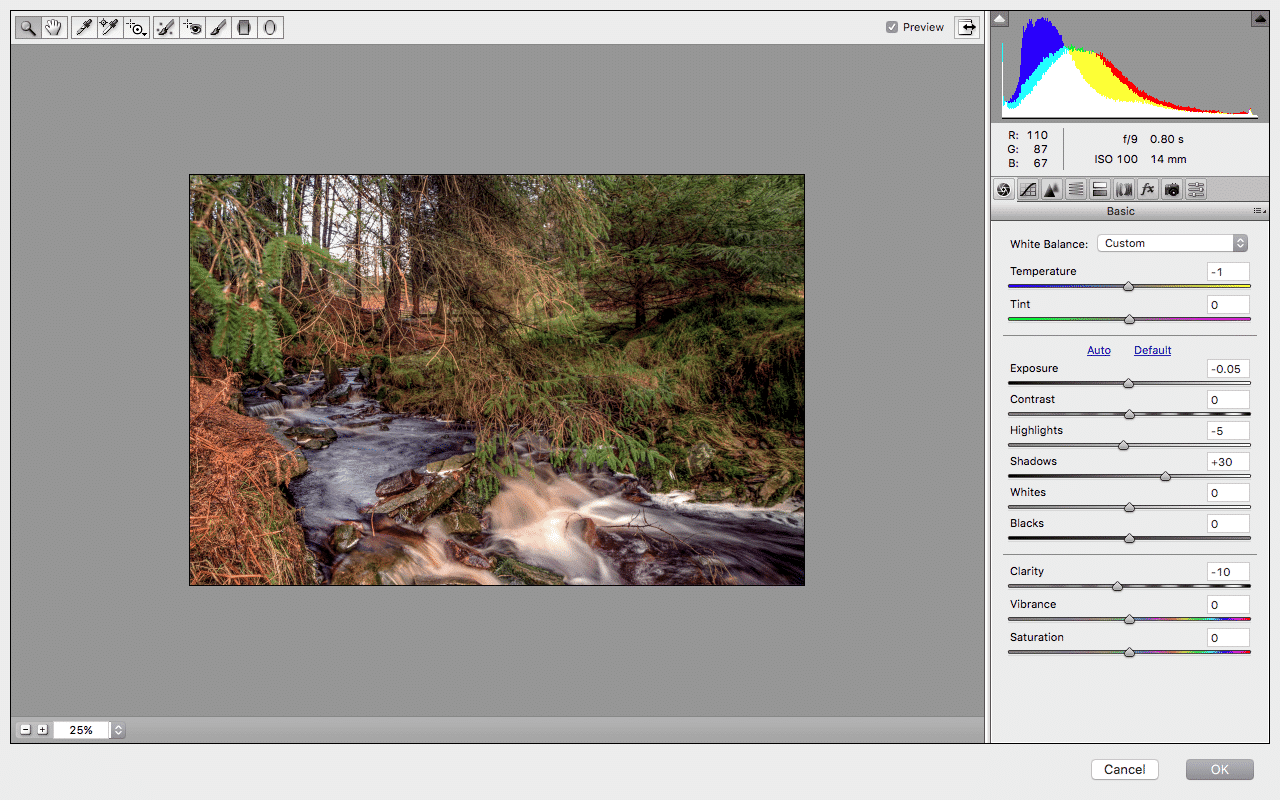
It’s certainly worth you knowing then when batch editing in Lightroom or using Camera RAW in Photoshop, images will be compressed in order to enable you to edit large volumes of images at one time, meaning the quality of what you see in the image here, particularly in the thumbnails, will be less than what is eventually opened up. This is especially noticeable in Photoshop, so be very careful with processes such as sharpening or clarity here. I would always consider simply reopening the Camera RAW filter once your image is open in PS and you can inspect the true quality of the RAW.
Here is an example of what Camera RAW usually looks like in PS:
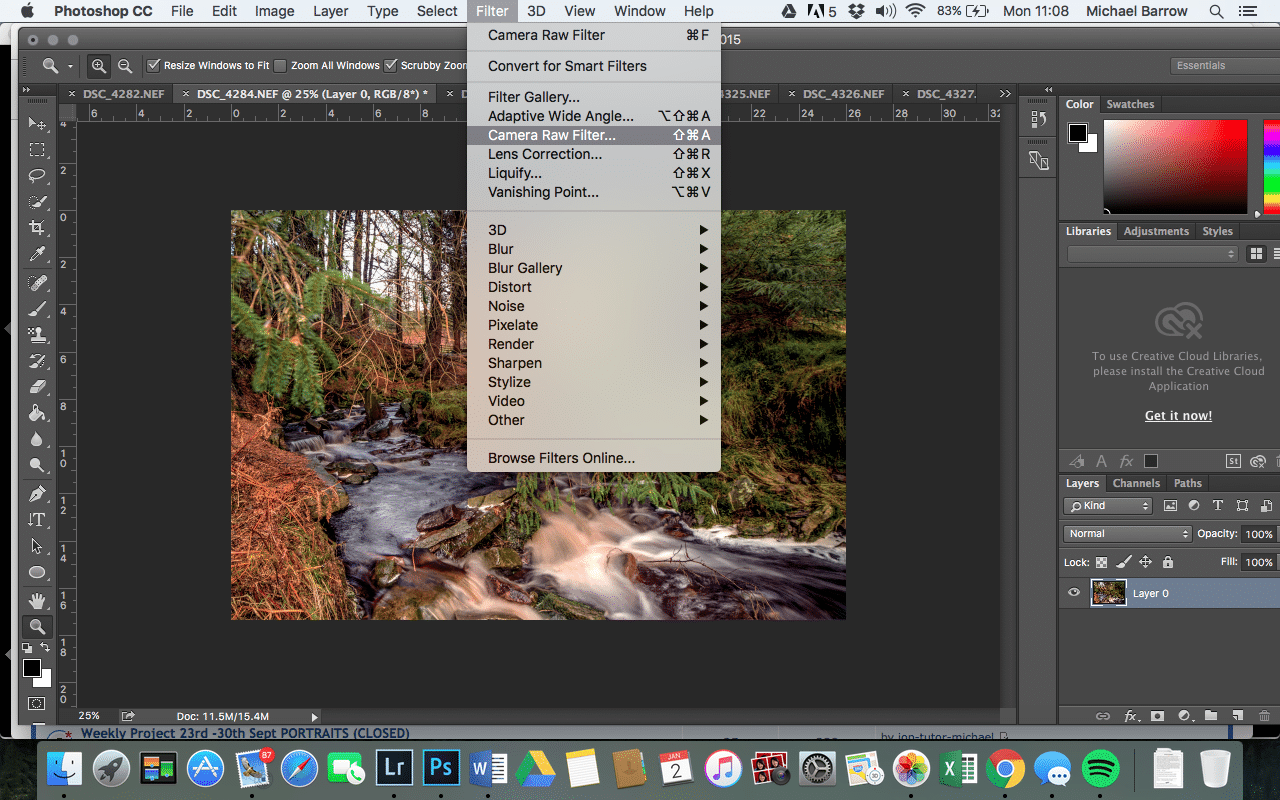
When your image is open, you can always revisit the Camera RAW section in your ‘Filter’ drop-down.
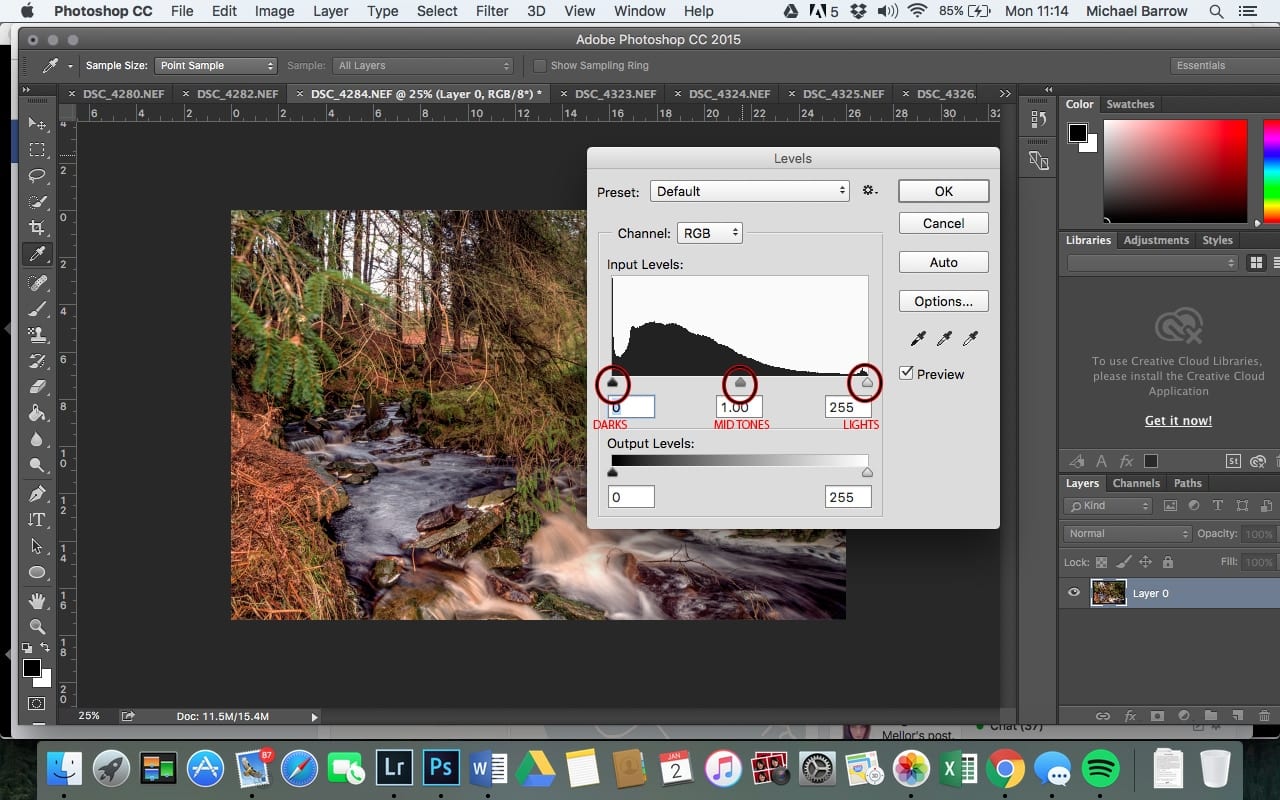
Your Histogram and Exposure Levels
I could talk for hours and hours about the various editing basics, but it’s integral that you start to understand your Histogram and its relation to the exposure levels of an image.
If you were to open your levels in Photoshop (cmd-L), you’d see your Histogram. This graph, put simply, shows the distribution of tones throughout your image. A well-exposed image will peak somewhere between the darkest tones and the lightest tones but still, continue to the ends of your histogram.
This can always vary depending on your light source and the general mood of a shot. If at any point you have a bare line in your histogram, it means that you can afford to up either the lights or the darks in your image using the cursors, marked below. Once you begin to get comfortable working with these techniques, you’ll be able to recognise an image whose lighter areas could do with being upped or darker areas deepened and the Histogram will show this.
Leave A Trail!
It’s so important that when you’re editing any image, basic or complex, you leave a trail that enables you to get back to you starting point. Most photographers will instantly duplicate their layer once they get into Photoshop.
Sometimes you can be making action after action and the various backups and reverses used can start to become confusing. It only takes a couple of wrong turns in this instance before you’ve made an irreversible change and have to start from scratch with the initial RAW. It happens to us all!
So there you have it. A brief yet important look into basic editing. As I mentioned earlier, you will all go on to work in different ways which will evolve and develop over time anyway, but if you can adhere to the integrity and structure of your RAW photographs from the very beginning, you’re certainly heading in the right direction.
Want to know more about editing? Join an IOP® online photography course today.