Part 2: High Dynamic Range vs Dynamic Range Optimisation
DRO and HDR are very similar methods in overcoming the problem we described in photographing the interior of the room.
The significant difference is that HDR techniques were achieved on the computer using Photoshop, Photomatix Pro or other similarly designed software. DRO, however, can be done ‘in camera’.
Manufacturers have different names for their DRO modes. For instance, Sony calls its offering Dynamic Range Optimisation or DRO, Nikon’s is Active D-lighting, Canon has Auto Lighting Optimiser, while Fujifilm has christened its version D- Range.
DRO is an emerging technology that manufacturers are intruding into their products to achieve the same results as HDR photography but without the need for additional, and sometimes, expensive software.
The technique that DRO uses is pretty similar to that used in HDR.
What is HDR?
HDR photography is the combining of three images, taken in Aperture Mode, into one to produce a properly balanced exposure.
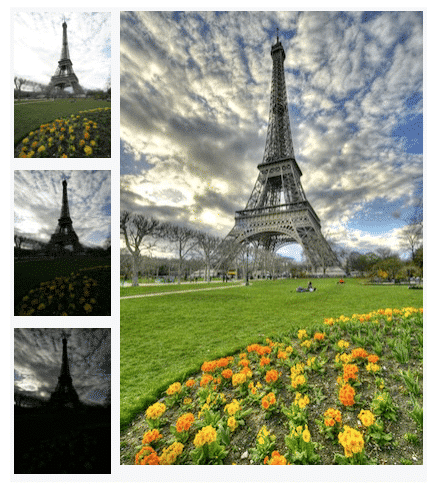
The method involves taking an average setting exposure, as we described in the example of the room. Two more images are then taken at 1, 2 or 3 stops above and below that average setting. Most modern cameras can be set to do this automatically using a facility called Exposure Bracketing.
For example, going back to our room, let’s imagine we have set our camera to a low ISO setting of 100 and the lens aperture to F8 for a good depth of field.
The camera will automatically set the shutter speed to achieve what it bests thinks is an average exposure across the scene. Before we take the shot, we set the camera’s Exposure Bracketing facility to 2 stops.
The choice of how many stops to use is an individual judgement call based on an assessment of the extremes of illumination and shadow presented to the camera.
Next, we take the first shot at average exposure at F8. On the next shot, the camera will automatically increase the shutter speed as if the aperture had been decreased by two stops to F16.
The actual aperture setting remains at F8. On the third shot, the camera will automatically decrease the shutter speed as if the aperture had been increased two stops up to F4. The actual aperture setting remains at F8.
What’s happening here? Our first shot is the average exposure the camera thinks is the best result it can achieve. Most of the interior of the room will be properly exposed.
In the second shot, the decreased shutter speed is restricting the amount of light entering the camera. This is to expose correctly for the bright illumination coming through the windows.
In the third shot, the shutter speed decreases to allow more light to enter the camera and thus expose properly for the more dimply lit areas of the room.
Now you have your three images; you can combine them using appropriate HDR software to achieve a blended image that produces a balanced exposure.
How Does it Differ from DRO?
Using the DRO facility in your camera requires only one shot. The software causes the camera to effectively overexpose the shot to bring out detail in lower lit areas.

The DRO facility then alters the brightly lit areas down to produce a balanced exposure across the scene. One advantage of DRO over HDR is that a tripod is not needed.
Accessing and using your camera’s DRO facility varies between manufacturers, so be sure to check out your camera’s User Guide.
Beware The “Gotcha” in DRO
The flexibility of DRO to process images varies between manufacturers. DRO does not work when shooting in RAW mode (pure sensor information), only in JPEG mode.
As JPEG is a compressed image format, the ability to perform advanced post-processing is restricted. DRO can also put quite a load on the sensor when working on an image, thus shortening battery life.
Also, DRO will not permit taking a shot at the lowest ISO setting of the camera as this is used by the DRO software as part of the under-exposing process. This can lead to noise artefacts appearing in lower lit areas of the image which are tricky to remove from a JPEG image quickly. They can be removed but require more time-consuming methods.
DRO is not a panacea. The result you see in the camera’s viewing screen may not be the same when you set the image onto a computer and view it on-screen.
For this reason, many photographers prefer to take the three images as previously described and combine them using HDR software on a computer where they have much more control and flexibility over the final result.
In Part 3, coming soon, we will look at DRO in action.
Take a Course With IOP®
If you decide it’s too challenging to learn photography on your own, get some help from the experts. IOP® provide the most popular online photography courses available. We have over 20,000 students, all over the world, following our program and creating photographs they never thought possible.