One of the first lessons we learn when first taking up photography is how the position of the camera in relation to the light source greatly affects the exposure. We’re told to ensure the light is above and behind our left or right shoulder so that the path of light falls onto our subject.
We’re told to avoid situations where our subject is in front of a much brighter background, which will tend to result in our subject appearing underexposed. This will result in a loss of detail on the subject resulting in some instances in silhouette.
Well, that is all good advice and was certainly important to consider back in the days of film photography, where exposure was much more difficult to control and rescue post-capture.
Today’s digital cameras will still react to backlit subjects in the same way – underexposing the subject facing away from all that brightness. But, we have much more control at our finger-tips to manage how that backlit effect influences the appearance of our subject.
And the creative potential of presenting our subject against a bright backdrop can reward us with dramatic images where line and shape are greatly emphasised.
The camera’s metering system detects the extreme brightness behind our subject and in order to avoid over-exposure, it applies less exposure. Any object or space that is outside of the strong lit backdrop, therefore, will be underexposed.
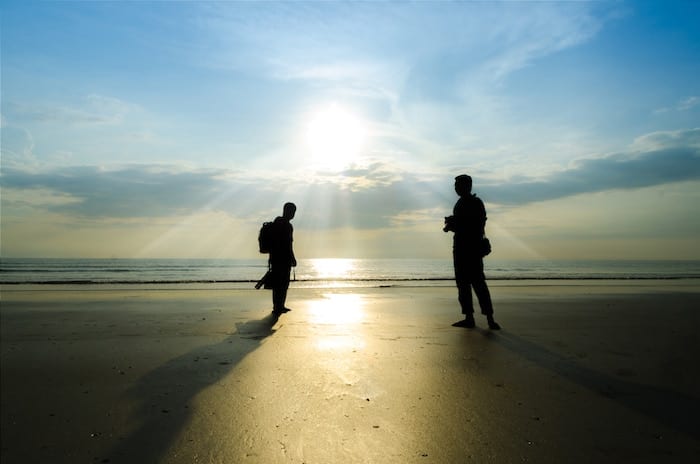
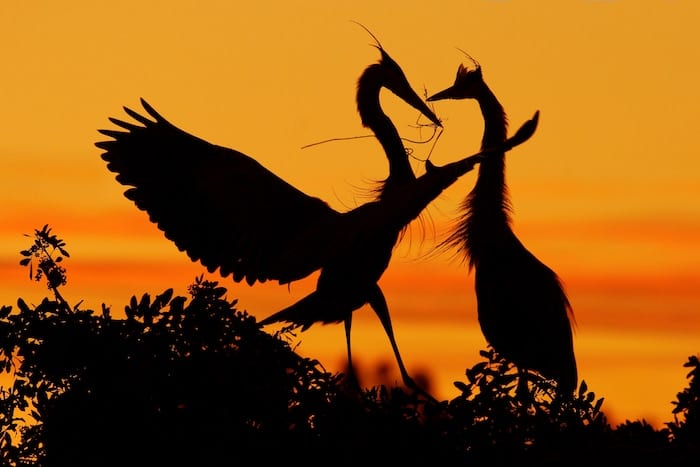
However, while photographing into the light does present us with some challenging exposure issues, it also produces interesting qualities in our subject. Contre-jour is a technique that is useful for revealing strong, powerful shapes and lines in our subject, such as we associate with silhouette images where the outline of a person, tree or building, for example, against a bright sky is pronounced and obvious.
Contre-jour allows us to use the effect of strong backlighting to alter the appearance of our subject in an eye-catching way, which also uses high contrast conditions to develop mood and drama in our composition.
Choice of subject

One of the great things about this style is we can apply it to any subject, so you are welcome to photograph your preferred subject genre if you wish to photograph it against the light.
For example, in landscape or coastal photography, the naturally dark landscape in front of the bright sky or sea will create a strong sense of shape. And if the main strength of that light is to the side, out of shot, the cross-lighting effect will reveal three-dimensional shape and texture.
The most obvious situation is having the subject in front of a bright, sunlit sky, but you could use artificial light if you wish. The point is to use that contrast in brightness between subject and backdrop to emphasise shape and form in some way. Backlighting in portraiture can create a rim light that subtly reveals the subject’s outline, for example.
Photographing into the light will cause a solid object to be underexposed, but this is a style of photography that can reward us with beautiful levels of detail and colour when photographing translucent subjects that are backlit. For example, flowers and leaves.
What we want you to do for this project is to photograph into the light as a way to present your subject in a way that creates visual and emotional impact. So, there’s lots of creative freedom in terms of how you apply the contre-jour technique to a subject that engages and interests you.
Factors to consider
1. Photograph safely
Do not look directly into the sun with the naked eye and especially through the camera lens. Telephoto lenses will magnify the sun’s intensity, so please ensure you are not looking into the sun in order to protect your eyes.
2. Metering
Use the default multi-zone meter on your camera for best results. This includes the Evaluative meter on Canon models, Matrix meter on Nikon cameras. Other models refer to this type of metering as multi-zone or multi-segment. Essentially, this metering mode analyses light intensity across the entire viewfinder rather than one area. This will be easier to manage than using spot metering, for example.
However, do make sure you expose your scene for the brightest area so that the details in the sky or backdrop are not completely blown out.
Use the video guide to the histogram in Unit 7 of your course as a guide.
In order to retain detail in your subject, avoid having the sun or main light source in the viewfinder. Contre-jour is synonymous with silhouetted subjects, but that’s not the only way we can use backlighting. With careful placement of the camera in relation to the light source, we can still expose our subject so that some level of detail is recorded.
3. Manage the intensity of the backlighting
It’s often easier to manage exposure by not having the sun directly in the shot, rather just outside of the frame. However, if you want to include the sun in the frame, use a narrow aperture to reduce the size of the bright disc. This will also produce a star-burst effect. Masking the sun behind an object in the composition, such as a tree or structure of some kind, will temper its intensity. The dark-bright contrast will still define the image, but without the sun directly in the shot, you’ll find it easier to manage highlight strength.
4. Watch your highlights
Use the histogram on your camera along with any highlight warning function it may have. This will help you to retain tone in the brightest areas. Don’t worry too much about underexposure in the shadows because you’ll be surprised how much detail is recorded by the camera sensor in this part of the dynamic range.
Using exposure compensation will help you to temper the strength of the bright sky so that tonal information is recorded in this part of the picture. It’s an invaluable tool.
5. Shadow detail and silhouettes
Contre-jour is synonymous with silhouette photography– where the subject’s shape against the light background is all that can be seen. That is an approach you can experiment with for this project, but you can also balance out the bold outline backlighting creates with some evidence of detail in your darker subject area. This can be managed in-camera using the exposure compensation and histogram controls to manage the intensity of the tonal range. However, when developing the image in software, see how applying a little shadow reduction brings out hints of shape and detail in your backlit subject. This will develop greater levels of interest in this key area. The emphasis will still be dark against bright, but your subject does not always need to be a solid, underexposed shape.
6. Lens Flare
Lens flare – modern lenses have an excellent coating to help combat flaring, but shooting into the light will increase the risk. Use a lens hood if you have one. A prime lens will tend to reduce the risk of lens flare because of the less complex optic design inside the barrel. Point the lens away from the light source to reduce the risk of lens flare.
Flare is not always unwanted. Its effect can be used to underscore the presence and drama of the lighting, so if you want to use flare as part of the overall impact in your picture, feel free to do so. But, be aware that its presence may draw attention away from the subject and it will produce areas of low contrast shapes and marks on the picture. Moving the light source out of the viewfinder will help to reduce the risk of flare. Shooting directly into the sun will increase that risk.
Using a narrow aperture will help to manage that intensity of light and if shooting into the light source directly, the small aperture will cause the blades inside the lens to form a starburst effect, which can add another element of line and shape, and movement to the photograph.
Find out more about our online photography courses here