The Ansel Adam Zone System (AAZ System) has, for many years, been one of those concepts that photographers liken to Marmite. You either love it or you don’t.
For those that don’t love it, an adversity to the AAZ System seems more to do with understanding exactly what it is and how it can be successfully applied to photography work.
In this article, we’re going to try and simplify the AAZ System in terms of its origins, the theory behind it and its practical application.
The Ansel Adam Zone System requires an understanding of the nature of light, colour and tone. Some would say the last two are the same but they are not. Let’s first consider the nearest thing to a camera; the human eye. Both have several things in common. For example, both have a lens to enable an object to be sharply focussed on. The eye’s pupil controls the amount of light entering the eye. In a camera, the aperture fulfils the same function. And finally, in a camera, the film or sensor receives the light to capture an image. In the human eye, the retina translates the image entering the eye allowing the brain to make sense of what is in front of the eye. One major difference between the human eye and a camera is the dynamic range each can handle. By dynamic range, we mean the extremes of light and dark that can be processed. The human eye trumps the camera in this respect every time.
Both are designed to receive light. Everything we and a camera sees depends on light. Everyday objects that surround us can be seen because they are reflecting light, not emitting it themselves. The easiest source of light to consider is the sun which visible emits white light. However, visible white light is a spectrum of seven wavelengths of colours, Red, Orange, Yellow, Green, Blue, Indigo and Violet. This is why we see a rainbow when light is refracted through raindrops in the sky. Furthermore, the reason we see things in colour is because objects absorb certain colour wavelengths and reflect the remainder. This is why a banana looks yellow and blood looks red.
A single colour can possess a tone. If we imagine paint, we can darken or lighten a colour buy adding a black and white mix respectively. Mix Black and White in different proportions and we have differing ranges of Grey. So, for example, if we take two samples of colour blue paint and add a light grey paint to one sample, we are toning up the original blue. Likewise, if we add a darker grey to the second sample, we are toning down that blue sample. However, our eyes will recognise both results originating from the same two identical samples of blue paint. If we consider colours as part of the visible spectrum of light, tone is related to the luminance or indirect or reflected light.
This is the starting basis of the AAZ System which was originally conceived in the 1930s in relation to black and white plate photography film. However, its basic tenets still apply to photography today whether you’re using roll film or a digital camera. Going back to the concept of visible light tones or luminance, let’s throw in another concept to muddy the waters.
Cameras see in colour but expose in monochrome. Confused? This is why the AAZ System has the Marmite effect for some photographers and understandably so. Go search any academic text on the AAZ System and the will to live, let alone carry on taking photographs is quickly lost.
Let’s stop to think about this. Exposure is letting in the right amount of light for the right amount of time so that the scene does not contain white blown-out areas or black shadowy under-exposed areas. The colours of the objects in the scene are relevant but so is the amount of light they reflect. Let’s imagine, for example, we’re photographing the interior of a room lit only by natural daylight entering through a window. Some areas of the room will be brightly illuminated while others will fall into increasing levels of shadow. Let’s imagine a table right up against the same wall below where the window is located. The table and areas around it will fall into shadow. Now imagine the table is painted dark blue. Then we swap the table for an identical one in an identical position but this time pained in brown. What difference will the colour make to how the camera tries to expose the scene so as not to lose detail in the shadow areas on and around the table?
The answer is simple. None. However, if the camera “sees” the scene in monochrome, it becomes easier to deal with. Remember, we’re dealing with tone or luminance.
Let’s try a simple exercise that you can replicate yourself. For this, we’re going to use Photoshop but any equivalent software, like Gimp’ will produce the same results.
Create a new file in RGB colour space with a white background and on that background place 7 equal size squares and line them up horizontally. Now fill each individual square with a colour of the rainbow. These are the Hex/RGB values you can use.
Red (Hex: #FF0000) (RGB: 255, 0, 0)
Orange (Hex: #FF7F00) (RGB: 255, 127, 0)
Yellow (Hex: #FFFF00) (RGB: 255, 255, 0)
Green (Hex: #00FF00) (RGB: 0, 255, 0)
Blue (Hex: #0000FF) (RGB: 0, 0, 255)
Indigo (Hex: #4B0082) (RGB: 75, 0, 130)
Violet (Hex: #8B00FF) (RGB: 143, 0, 255)
Now create a layer copy of the 7 squares so that one set is positioned just below the original set. Now take that second set and reduce them to black and white.
What you see in the second set is not the colours but the luminance of that colour as different shades of grey.

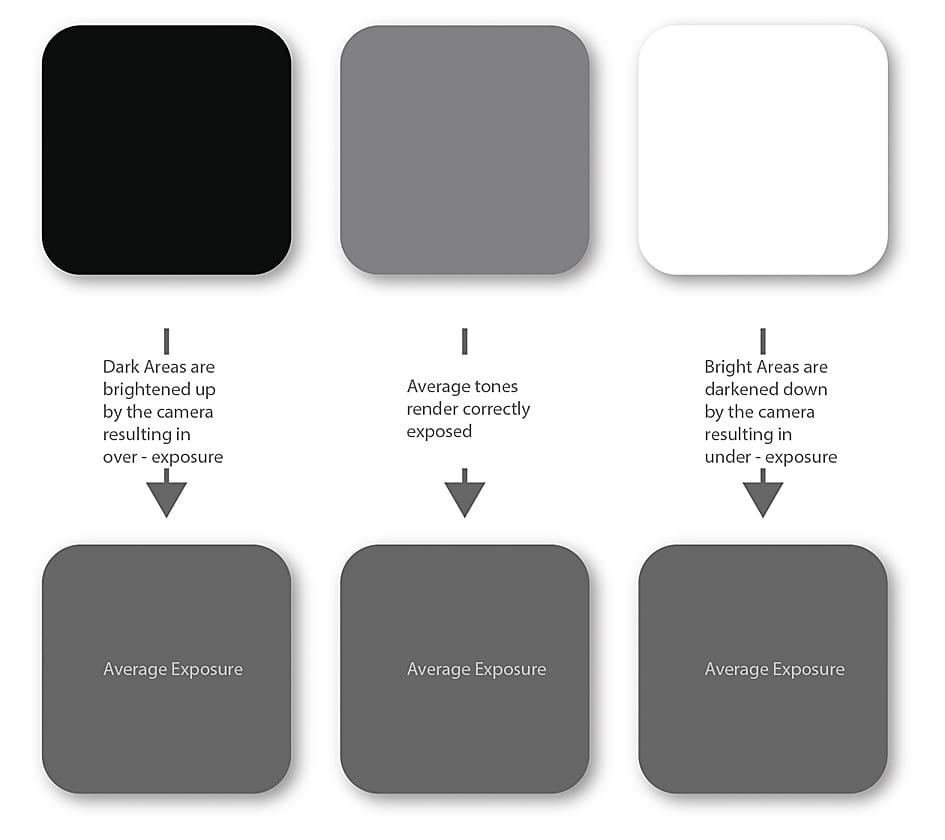
The AAZ System is built on this exact principal. By seeing luminance and not colour, and seeing that luminance within a dynamic range, it is possible to adjust the camera to achieve the best possible exposure for a given scene. It’s important to note that 18% grey is the tonal luminance which cameras use to achieve an average exposure. So, dark areas are over-exposed to bring them up to the 18% grey while bright areas are under-exposed to bring them down to 18% grey.
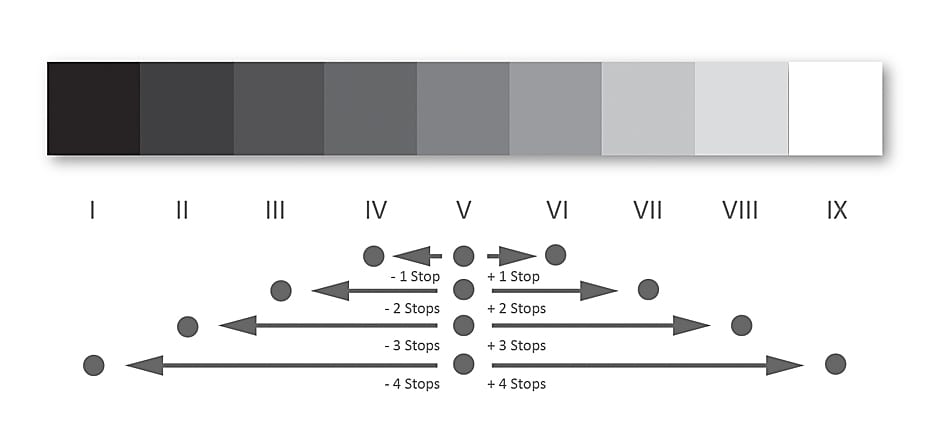
The AAZ System was originally conceived of as 10 zones of luminance (though there are variations that consider 9 or 11 zones). For the purposes of this article, we’ll consider the original concept as nine zones. Imagine nine squares lined up horizontally. The far most left square (Zone I) contains pure black and the furthest on the right (Zone IX) is pure white. As we travel from left to right, each square will contain a decreasing tone of grey such that the middle square (Zone V) contains 18% grey (or 18% black mixed with 78% black). Zone V is known as the average tone or luminance.
The square to the left of Zone V (Zone IV) will contain a darker grey equivalent to 1 stop below Zone V. Zone III will contain a darker grey equivalent to 1 stop below Zone IV and so on. If Zone 1 is not exactly 1 stop below Zone II we can amend that square’s level of grey.
Likewise, Zone VI will contain less grey than Zone V equivalent to 1 stop above Zone V. Zone VII will contain a level of grey equivalent to 1 stop above Zone V1 and so on. If Zone IX is too white, it can be changed to its level of grey is exactly 1 stop above Zone VIII. Now we have our nine zones of tonal range.
The last important note is that Zone V is designated the average tonal luminance (18% grey) and, as previously mentioned, is the value on which cameras try to average out the exposure for a scene. This is no different for digital cameras.
Ok, let’s stop for a moment and recap some important points. As shown in our Photoshop exercise earlier, colours have tonal illuminance. Tonal luminance is represented as a shade of grey. That shade of grey can be darker or lighter than the average 18% grey of Zone V.
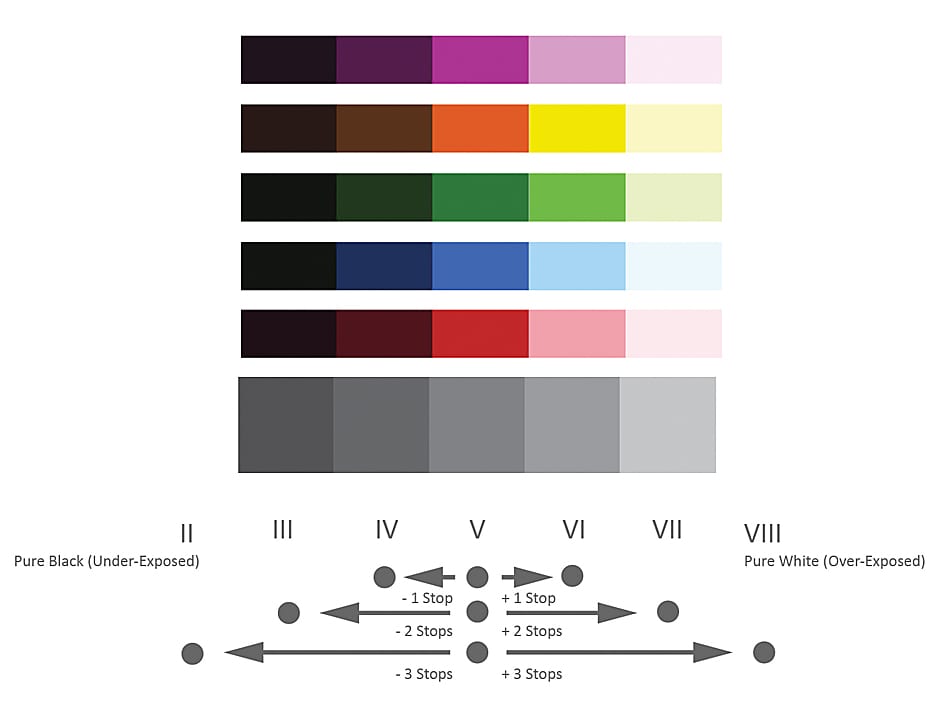
The next essential point in understanding the AAZ System is that the levels of grey represented in the nine zones is independent of actual colour. That is to say, different colours can have the same tonal illuminance value. So, for example, certain shades of red blue and green can all have an 18% (Zone V) tonal range and these include the colours of sky, foliage, etc. On the other hand, Yellow and Pink can have a tonal illuminance equivalent to Zone VI (or one stop above Zone V). Brown and Purple can have a tonal illuminance of Zone IV (or one stop below Zone V). The essential point to remember is not to see the colour but its tonal illuminance value.
Colour tones that are a bit brighter than the average, would fall into Zone VI. Those colours are more like pastels, or faded average colours. Those tones include pure yellow, bright-pinkish red, baby blue, baby pink etc. Colour tones that are brighter than that would fall into Zone VII. These include white snow, white clouds, fog, smoke, mist, bright sand. Colour tones slightly darker than average would fall into Zone IV. Those include tree trunks, dark blue skies, and so on. Colour tones that are darker than that would fall into Zone III. Those tones include black puppies, black shoes, extreme shadows, coal, etc.
AAZ System and Digital Photography
While the AAZ System was originally conceived for film photography, it is highly relevant to modern digital photography. However, unlike the original nine to eleven zone variations from the concept, digital photographers only need to consider the middle seven zones, Zone III to Zone VII representing the darkest and lightest areas of a scene. Anything in Zone II would be rendered black (complete under-exposure) and anything in Zone VIII would be rendered white (total over-exposure).
Using the AAZ System is not tricky if we remember to take the scene we are faced with and determine which part of it we want to correctly expose for (achieve Zone V). In digital photography, a generally correct exposure of an average scene is one that is exposed for the mid-tones, with no blown out highlights. The emphasis is on blown out highlights because highlight (or clipped) photo details are more troublesome than shadow clipped photo details to deal with post-processing.
So if the dynamic range of a scene is greater than one to be captured with only one shot, you have the choice to forfeit either the highlights or the shadows of a photograph. Unless the jeopardised highlight area is really too small to have any significance, you should always protect the highlights. Blown-out highlights yield a feeling of something missing in the photo while blown-out shadow detail is more acceptable and sometimes even intentional for specific effects.
Applying the AZZ Principles:
To round off, we’re going to look at three examples of how the AZZ System can be applied. In describing the thinking behind each image, it’s important to state that the camera’s Exposure Lock system was deployed to take a meter reading. Exposure Lock simple allows you to meter for a specific part of the scene and ‘store’ that reading as you recompose the picture prior to taking the photograph. Different manufacturers enable the Exposure Lock facility differently so be sure to turn to your camera’s User Guide for more information.
This this first example, this picture of Harringworth Viaduct in Rutland, UK, is actually a Photoshop stitch of 7 images taken across a 160 degree arc. The day was very sunny creating quite a contrasty image. If the camera has taken an average meter reading it would have been fooled by a bright sky causing it to under-expose for the subject and foreground.
By deciding the brickwork in the subject should be the Zone 5 average exposure, the camera was zoomed into the centre column and spot-metered. Locking that exposure value and then recomposing achieved the result.
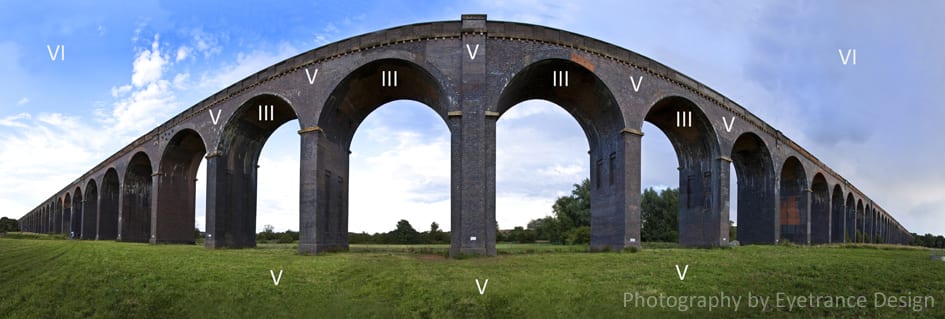
The process of spot metering the centre column and exposure locking the reading was done before each shot was taken. As seven shots can be taken fairly quickly there was no risk of a radical change in light on the brick work. The result is a correctly exposed image with the sky having a Zone VI tonal luminance and the shadows in the arches corresponding to Zone III.
The next example shows how the AZZ system can be applied to very tricky lighting situations. This shot was taken as part of a local Fire & Rescue Team live training session. The session took part in a derelict building where light entering caused high levels of shadows and brightly lit areas in equal measure.
In this particular shot, an average metering of the scene would cause the camera to see a lot of dark areas. As a consequence, it would have over-exposed the scene via a longer shutter scene resulting in either blurred motion of the Fire Fighters or worse still, the need for a tripod which simply not practical.
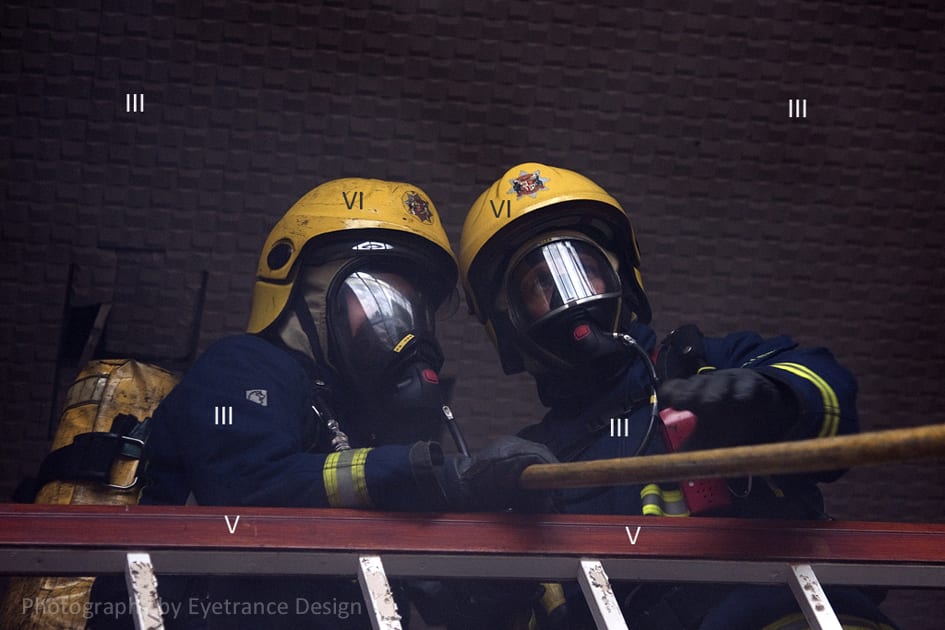
By zooming in and spot metering the balcony rail and exposure locking the reading (Zone V), a good shutter speed was achieved without massive under-exposure of the background. If we had spot metered for the reflection off the visors, the remainder of the photo would have been drastically under-exposed. However, the overall result does allow us to see these guys at work.
In this final example, the AZZ System can be applied to portraiture. This particular image was taken during a model shoot using a gazebo on a very bright summer’s day. Whilst this served to evenly disperse the light within the tent, the model had very light skin and was wearing a dark top in front of a dark patterned background. An average meter reading would have produced an overall over-exposure to account for the tonal luminance of the top and background leaving the model’s face over exposed and bleached.
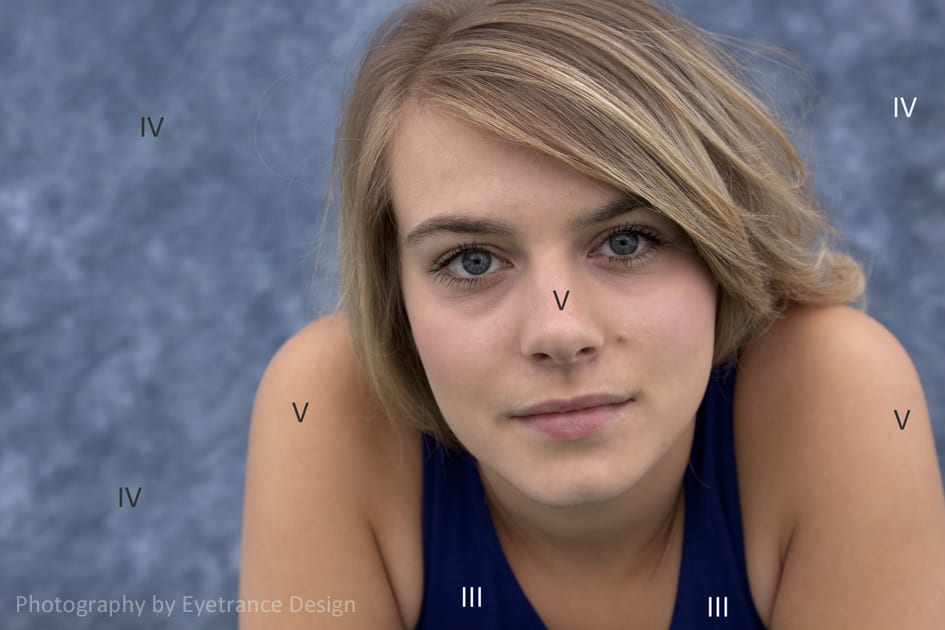
As the model’s face is obviously the most important element of the photo, the camera was spot-metered for the light reflecting off her nose and cheeks and the reading exposure-locked. The result is the background having a less imposing tone while the model’s top hasn’t been reduced to total dark.
Increase your photography knowledge with an online photography course from IOP.